Happy Thursday Everyone!
This past weekend (I'm late I know, it's almost the next weekend!) was very eventful for me, with it being Father's Day weekend and all, but it really all got started on Friday when I drove all the way from the Inland Empire to Canoga Park (about an hour and a half drive) for a MAC makeup seminar with Laura Arellano, but she is better known for her Instagram name
@Loreleicakes. If any of you follow her on Instagram you may have seen that she created a seminar for any of her followers in the LA area to come to her location and learn her face routine. Upon seeing this I inquired about it right away. I really LOVE her work and felt it was a great opportunity to see how she does what she does. I learned after a few emails that in order to reserve my space I needed to make a $50 reservation that would be used toward MAC purchases.
So I arrived a bit early for the seminar and when I reached the MAC counter in Nordstrom a woman escorted me to where Laura was sitting. She greeted me with a hug and was super friendly. I chatted with her and the other artist who would be demoing for the day whose name was Ilene, and another woman who was there for the class. Once everyone got to the store we walked up to a private room that was set up with chairs and a stage. They also provided us with a notebook, face charts, eye chart, and a full list of their face routine rundown which included all the products, the order in which they were being used and all the brushes they used. The seminar lasted for a little under 2 hours and it was very informative and fun to see how these pros put their faces on. It was an intimate setting so it made it comfortable to ask questions. and I was sitting in the front row about 2 feet away from the artists so that made it easier to see their techniques.
I picked up a few very helpful tips, I was mainly interested in how she does her eyebrows! They're perfect, and though I didn't completely succeed at recreating them when I went home, I now know how and I'm working on it :).
I had a great time and met some cool people but the only thing I would say was a little irritating about the whole thing was the whole time I felt more like they were just trying to sell us product rather than really teach us anything. But I mean, they were still on the clock at work and they make commission so I can't hate on their hustle because they made a nice chunk of change off of use for just being there for 2 hours. I was proud of myself though, I spent about $94 in total (this includes the $50 I used to reserve my space, so the damage wasn't too great. Overall it was an experience and it's cool to be able to say I met and learned something from her. I just wish that my last impression of the experience wasn't me sitting in traffic for 3 hours trying to get home, but I knew what I was in for!
Also I'll be making a separate post very soon about my purchases and give some reviews on things since I've had a few days to test them out.
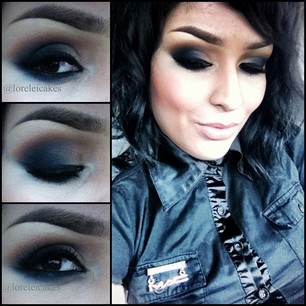
Photo Credit: @loreleicakes via Instagram
Photo Credit: @loreleicakes via Instagram
Also the look above it basically what she showed us how to do in the class, just a little more fancy :)
I also thought it was cool that when we walked in they had notebooks, face charts and a full list of all the products and brushes used in the demonstration. But I'm a lil bummed that I didn't get any pics of them while they were up on the stage doing their makeup, but they asked us not to take pictures (cuz they didn't have a face on through most of the demo) so we obliged. I only got a shot of the aftermath!
Above: the book for notes they provided
Above: Empty face chart, can't decide what look I wanna use on it...
Above: Full list of products and brushes, and some Instagram names I wanted to remember. Shout out to
@itzpeechezyo! Follow her on Instagram, she took the class with me and she was super awesome. Glad I got the chance to meet her. And if you haven't read it in my contact tab, follow me too, duh!!
@mandy_apple
Below: The AFTERMATH!


.JPG)


.JPG)
.jpg)


.jpg)
.jpg)